akka Stream 첫번째
akka Stream.
akka-stream
akka-stream은 처리연산의 설계도의 Component pipe 조합이다.
이들은 Stream 이라는 이름처럼 지연를 이용한 실행시 어떻게 처리할 것인지에 대한 설계도이다.
설계도는 Stream component들의 조각들은 재사용 가능하고, 또 이를 다른 최종 설계도에 다른 부품으로 사용 할 수 가 있다. 그리고 이후에 이를 실행하면 설계도에 따른 처리연산을 진행하게 된다.
또한 이들은 map, flatMapMerge, filter , fold, groupBy 등의 연산이 있다.
akka-stream에서 기본적으로 기억해야할 항목들은 다음과 같다.
- Source
- Sink
- Flow
- Shape
- Graph
- Materializer
이들의 정의와 특징들과 사용법들을 알아 보자.
akka는 설계도를 설계하고 이들(이들은 모두 Graph이다)은 이들은 Publisher, Subscriber의 형태로 작동한다.
Source
Source는 하나의 오픈 출력을 갖는 스트림 처리 단계들의 집합이다. 다운스트림 단계가 수신할 준비가 될때마다 데이터 요소를 방출 한다.
final class Source[+Out, +Mat](생략...) extends FlowOpsMat[Out, Mat]
	with Graph[SourceShape[Out], Mat]
위의 코드는 알아보기 쉽게 생략했는데 위에 코드를 보면 2개의 type parameter를 받고, Source는 Graph의 유형임을 알 수 있다.
그리고 2개의 type parameter중 1번째는 Source가 출력하는 유형이며, 2번째 parameter는 실체화시 유지되는 반환유형이다. 이는 추후 Materializer부분에서 이야기 하기로 한다.
akka-io 에 나와 있는 예제이다.
//actorsystem
implicit val system = ActorSystem("QuickStart")
//실체화시 암시적인자 필요
implicit val materializer = ActorMaterializer()


//(1 to 100) 까지의 Int를 열린출력으로 내보냄을 나타내는 설계도
//NotUsed는 실체화 값을 가지지 않는다.
//이는 설계도 일뿐 실행시 실제로 처리가 진행
val source: Source[Int, NotUsed] = Source(1 to 100)

//처리가 진행
//처리 결과의 실체화는 Future[Done]
val result: Future[Done] = source.runForeach(i => println(i))(materializer)

result.onComplete{
	case Success(a) => println(a)
    case Failure(e) => println(e)}(system.dispatcher)

//Source는 Graph이며 stream처리 설계도 이고 열린 output 출력을 가진다.
val factorial:Source[BigInt, NotUsed] =
	source.scan(BigInt(1))((ac, i) => ac * i)

//materializer를 가지고 실행시 return type는 처리한 byte수의 Future[IOResult] 이다.
val fileResult: Future[IOResult] =
	factorial.map(num => ByteString(s"$num\n"))
		.runWith(FileIO.toPath(Paths.get("/Users/sslee/temp/factorial.txt")))

//종료후 actorSystem은 내려가지 않으므로 완료시 actorSystem를 종료
fileResult.onComplete{ iors =>
  println("@@@@"+iors)
  system.terminate()
}(system.dispatcher)
Sink
한개의 열린 입력이 있다. 아래 정의를 보면 이 또한 Source 와 비슷하고 이역시 사실 Graph이다. 데이터 요소를 요청하고 요소를 받아 들인다.
final class Sink[-In, +Mat](생략...) extends Graph[SinkShape[In], Mat]아래 코드를 보자
implicit val system = ActorSystem("streamSystem")
implicit val materializer = ActorMaterializer()
implicit val executionContext = system.dispatcher

//어디로 보낼지는 모르지만 file 읽어 file내용을 ByteString으로
val source: Source[ByteString, Future[IOResult]] =
	FileIO.fromPath(Paths.get("/Users/sslee/temp/factorial.txt"))

//어떤 거에 연결 될지 모르지만 ByteString을 받아 File 로
val sink: Sink[ByteString, Future[IOResult]] =
	FileIO.toPath(Paths.get("/Users/sslee/temp/factorial2.txt"))

//source + sink = 1개의 열린 출력 + 1개의 열린 입력 = Graph(여기서의 최종 설계도)
val graph: RunnableGraph[Future[IOResult]] = source to sink

//설계도를 실행 실행결과 로는 Future에 Source에서의 IOResult가 들어있고 이를 println으로 console출력 한다.graph.run은 Future[IOResult] 이다.
graph.run().foreach { result =>
  println(s"${result.status}, ${result.count} bytes read.")
  system.terminate()
}
위의 코드를 보면 source to sink로 한개의 열린 출력과 한개의 열린 출력을 연결하여 Graph를 만들엇다. 위에서 RunnableGraph 선언되면서 실행 되지 않는다. 이는 설계도 일뿐이다. 실제 run를 실행시 실행되며 이를 실체화 했다고 말 한다.
실체화의 결과에는 Sink에서 쓴 byte수가 아닌,Source에서 읽은 byte수가 들어있다. Keep.left가 default이기 때문이다. 이는 이후에 Materializer에서 설명하기로 한다.
run()시 Materializer가 암시적으로 사용되어 지는데 이는 실제로 Source의 publisher에 해당하는Actor와 Sink에 Subscriber에 해당하는 Actor를 만들어 Source에서 읽은 byteString를 한번에 하나씩 파일 싱크에 넘어 간다.
Graph
위의 소스코드에서 보듯이 Graph는 Stream요소들의 처리 흐름에 대한 설계도 이다.
Graph는 Stream 구성요소들의 조합으로 표현되며, 그 구성의 모양(Shape)에 따라 달라진다.
RunnableGraph
Graph를 상속하고 있으며 Source 와 Sink로 연결되어 처리(실행) 준비가 된 Flow이며, 이는 아직 실체화가 되지 않는 것이다.
Materializer
Graph를 실행시 암시적 Materializer를 필요로 했다. 그럼 이 Materializer 가 어떤 일을 내부적으로 하는지 알아 보자.
Materializer는 RunnableGraph를 Graph를 실행하는 여러 Actor로 변환한다.
1.Source와 Sink의 연결를 점검
2.Source로 부터 ,위의 예제에서는 FileChannel을 열 FilePublisher Actor를 만들라고 한다.
3.Sink로 부터, 위의 예제에서는 FileChannel을 여는 FileSubScriber Actor를 만들라고 한다.
4.FileSubscriber를 FilePublisher에 가입 시킨다.
5.FilePublisher는 ByteString를 다 읽을때 까지 읽고, FileSubscriber는 이를 받아 File에 쓴다.
6.FilePublisher는 다 읽으면 작동을 중단하고 FileChannel를 닫고, FileSubscribe에게 달 읽었다고 OnComplete메시지가 도착하며, FileSubscriber는 자신이 쓴 file 를 닫는다.
위에 stream 실행시에도 take, takeWhile 등으로 실행 중간에 조건에 따라 stream을 중지 할 수 있는데, 이는 폴키우사노가 쓴 funcional programming in scala 일명 빨간책을 보면 Stream을 연습하는 부분이 나오는데 lazy를 이용하여 take, takeWhile, forAll, exist를 해보았다면 이해하는데 도움이 될 것 이다.
RunnableGraph를 또 실행하면 새로운 Actor 모음이 만들어지며 모든 처리가 처음부터 다시 시작한다.
Publisher와 Subscriber의 상호 작용
위의 예제에서 FilePublisher가 모든 데이터를 메모리에 올리면 OOM에 우려가 있다. 하지만 akka-stream은 그렇게 작동하지 않느다.
FileSubscriber가 FilePublisher에게 한번에 처리할 유한개의 원소를 요청message를 비동기 요청한다. 이후 Publisher는 요청 갯수 이하 만큼 보낸다. 그리고 Publisher는 요청할 때만 다음 데이터를 읽는다.
이는 구독자가 발생핮에게 자신이 처리할 수 있는 정보가 더 많거나 더 적다고 신호를 보내는데 이를 non-blocking pressure 라 한다.
WatermarkRequestStrategy
akka-stream는 모든 원소를 하나하나 요청하고 발행하는 것이 아니라 묶음씩 요청하고 발생한다.
구독자는 WatermarkRequestStrategy 전략를 사용하는데 이는 다음과 같다.
버퍼의 크기에 현재 데이터 양이 최저이면 구독자는 최대수위까지 더 많은 데이터를 요청하여 버퍼에 full로 채운다. 반면 현재 데이터 양이 버퍼의 최대 바로 아래이면 데이터는 최고수위 - 현재 수위 만큼 요청한다.
즉 버퍼의 수위에 따라 유동적으로 요청 크기가 달라 지며 중요한 것은 절대 최대 수위를 넘치지 않는 다는 것이다.
원소자체의 크기 즉 file인 경우 file 에서 읽어오는 chunk크기의 default값은 8KB 이다.
또 이 원소의 갯수를 지정할 수 있는데 이는 default값은 16으로 이를 계산하면 한번에 요청할 수 있는 최대 수위는 8 * 16 = 128KB가 된다.
갯수 지정은 akka.streammaterializer.max-input-buffersize로 지정 할 수 있다.
설정 file에 설정시
akka.stream.materializer.max-input-buffer-size = 16Materializer를 이용한 설정시
val materializer = ActorMaterializer(
  ActorMaterializerSettings(system)
    .withInputBuffer(
      initialSize = 64,
      maxSize = 64))
materializer한 값 조합하기
Source[+Out, +Mat]와 Sink[-In, +Mat]에서 본 것 처럼 source와 sink는 실체화 되었을때 외부 값을 제공할 수 있다. Future[IOResult]는 실체화시 읽거나 쓴 바이트 수를 가지고 있다.
to method는 default로 left 그러니깐 Source쪽 따라서 file에서 읽어서 처리한 byte수를 default로 한다. 이는 toMat method를 이용하여 right 혹은 left, right 둘다 도 할 수 있다.
//file에 쓴  byte 수 정보
val graphKeepRight: RunnableGraph[Future[IOResult]] =
	source.toMat(sink)(Keep.right)

graphKeepRight.run().foreach { result =>
	println(s"${result.status}, ${result.count} bytes read.")
	//system.terminate()
}

//file을 읽어들인 byte 수 와 file에 쓴 byte 수
val graphKeepBoth: RunnableGraph[(Future[IOResult], Future[IOResult])] =
	source.toMat(sink)(Keep.both)
val tt: (Future[IOResult], Future[IOResult]) =
	graphKeepBoth.run()
Future.sequence(List(tt._1, tt._2)).foreach { rs => rs.foreach(println(_)) }
위에서는 component 조합이 2개이지만 여러게로 복잡해지면 Keep.right를 할 경우는 left부터 right까지 pipe 시 Mat유형의 전환을 유지를 신경써야 한다.
Flow
하나의 입력과출력을 가지는 처리단계 유형이며, 흐르는 데이터 요소를 변환하여 요소의 흐름 상부에서 하부로의 연결을 하며 모든 Stream 처리 로직을 가진다.
간단한 사용법을 보자.
//필요한 암시자를 선언하고
implicit val system = ActorSystem("FlowSystem")
//실행후 Future에 필요한 ExecutorService
implicit val es = system.dispatcher
//RunnableGraph 실체화시
implicit val mat = ActorMaterializer()

//Source, Flow, Sink 선언
//단순한 Range로 부터 Source를 생성
val source: Source[Int,NotUsed] = Source(1 to 10)
//Int형을 받는 입력포트와 숫자원소에 2배를 하는 연산의 결과를 출력하는 포트를 가지는 Flow 생성
val flow : Flow[Int,Int,NotUsed] = Flow[Int].map(i => i * 2)
//Int 형을 입력포트로 받아 console에 출력하는 Sink생성
val sink: Sink[Int,Future[Done]] = Sink.foreach(println)

//Source + Flow = Source  => Source + Sink
val sourceJoinFlow: Source[Int,NotUsed] =
  source.via(Flow[Int].map(i => i * 2))
val graph: RunnableGraph[Future[Done]] =
  sourceJoinFlow.toMat(sink)(Keep.right)

val result:Future[Done] = graph.run()
위의 예제는 Source를 Flow와 먼제 결합한후 결합의 결과는 Source 이를 다시 Sink로 결합한 예제이다. 결합의 결과를 보이기 위해 결합의 진행 절차를 하나씩 두었다.
val sinkJoinFlow: Sink[Int,Future[Done]] = flow.toMat(sink)(Keep.right)
val graph02: RunnableGraph[Future[Done]] =
  source.toMat(sinkJoinFlow)(Keep.right)
val result2: Future[Done] = graph02.run()

Future.sequence(List(result,result2)).onComplete(_ => system.terminate())
위의 예제는 Flow를 Sink와 결합한 후 결합의 결과는 Sink이다.
이제 Source -> Slink 에 형 변환을 하며 Flow를 조합하는 예제를 보자.
Source[+In, +Mat] + Flow[-In, +Out, +Mat] = Source[Out, Mat]
Flow[-In, +Out, +Mat] + Sink[-In, +Mat] = Sink[Out,Mat]
가 된다. 그리고 Source의 map method 및 collect method등을 이용하여 형변환을 진행한다.
다음은 Akka in Action에 나온 예제 이다.
file을 parsing(ByteString) -> parser(Event) -> filter(Event) -> Sink(Seq[Event]) 형태로 진행 한다. 아래는 type를 보기 위해 절차 진행으로 하나하나 선언했다.
val source: Source[ByteString, Future[IOResult]] =
  FileIO.fromPath(Paths.get("/Users/sslee/work/temp/stream-source.txt"))

//framing 을 이용하여 Event 단위를 구분한다.
val frame: Flow[ByteString, String, NotUsed] =
  Framing.delimiter(ByteString("\n"), 1024 * 1024)
    .map(b => b.decodeString("UTF-8"))

//parser String 을 Event로 변환 한다.
//collect method는 return type이 Flow#Repr 으로 type Repr[+T] = Flow[In, T, Mat]
val parser: Flow[String, Event, NotUsed] =
Flow[String].map(s => parseLine(s)).collect { case Some(e) => e }

//Error 상태만 filtering
val filter: Flow[Event, Event, NotUsed] =
  Flow[Event].filter(e => e.state == Error)

//sink
val sink: Sink[Event, Future[Seq[Event]]] = Sink.seq[Event]
val runGraph: RunnableGraph[Future[Seq[Event]]] =
  source.via(frame).via(parser).via(filter).toMat(sink)(Keep.right)

val result: Future[Seq[Event]] = runGraph.run()

Await.result(result, 10 seconds) must be {
  Vector(Event("my-host-3", "web-app", Error, ZonedDateTime.parse(
  	"2015-08-12T12:12:03.127Z"), "exception occurred..." ))
}
scala.stream.scaladsl.Framing 은 조건를 주어 data를 구분할 수 있게 해주는 helper이다.
return type은 Flow이며, 방법에 따른 여러 method 들이 있다.
이가 필요한 이유는 수신한 요소chunk (여기서는 ByteString)이 한즐의 로그 이벤트만을 포함한다고 가정 할 수 없기 때문이다.
위의 code에서 Framing의 delimiter의 반환 유형은 Flow[ByteString, ByteString, NotUsed] 형태이다. 하지만 map을 이용하여 Flow[ByteString, String, NotUsed]로 변환 한다.
parse부분에 collect는 partitail function을 받는데 이 함수의 반환 유형으로 출력 type이 된다. 따라서 map의 결과 Option[Event]을 Event로 변환하여 Flow[String, Optino[Event], NotUsed] 을 Flow[String, Event, NotUsed]로 할 수 있게 한다.
Sink.seq[Event]은 Event출력 유형을 Seq[Event]으로 변환 해준다.
위의 예제를 좀 간단하게 다시 쓰면 다음과 같다.
val result02: Future[Seq[Event]] =
  source.via(Framing.delimiter(ByteString("\n"), 1024 * 1024)
    .map(b => b.decodeString("UTF-8")))
    .via(Flow[String].map(s => parseLine(s)).collect{case Some(e) => e})
    .via(Flow[Event].filter(e => e.state == Error))
    .toMat(Sink.seq[Event])(Keep.right).run()
다음 예제 또한 Akka in Action에 있는 예제로 json format의 log file (byteString) -> framingJson(byteString) -> String decode (String) -> jsonString -> Event -> Seq[Event] 으로 진행 한다.
첫번째는 type의 진행 사항을 보기 위해 나열한 소스코드 이고 다음 소스에는 간단하게 표현한 소스이다.
spray.json 이 필요하며 json to Event변환을 위한 암시자 작성은 생략했다.
val source: Source[ByteString, Future[IOResult]] = FileIO.fromPath(path)

//Framing으로 Event단위 추출을 위함
val jsonByteSource: Source[ByteString, Future[IOResult]] =
  source.via(JsonFraming.objectScanner(1024 * 1024))

//Source[ByteString,Future[IOResult]] 을 Source[String, Future[IOResult]]로 변환
val strSource: Source[String, Future[IOResult]] =
  jsonByteSource.map(b => b.decodeString("UTF-8"))

//String 를 Event로 변환
val parser: Source[Event,Future[IOResult]] =
  strSource.map(s => s.parseJson.convertTo[Event])

//Error filter
val filter = Flow[Event].filter(e => e.state == Error)

val sink: Sink[Event, Future[Seq[Event]]] = Sink.seq[Event]
val graph: RunnableGraph[Future[Seq[Event]]] =
  parser.via(filter).toMat(sink)(Keep.right)

val result: Future[Seq[Event]] = graph.run()
위의 예제에서 진행별로 Source를 선언 했는데 이는 Flow를 선언하고 이를 Source에 연결 해도 된다.
예를 들면
val strSource: Source[String, Future[IOResult]] =
  jsonByteSource.map(b => b.decodeString("UTF-8"))

//이런 부분을 Flow로 시
val strFlow: Flow[ByteString, String, NotUsed] =
  Flow[ByteString].map(b => b.decodeString("UTF-8"))

val strSource: Source[String, Future[IOResult]] =
  jsonByteSource.via(strFlow)
위의 코드을 좀더 간단하게 하면 다음과 같다.
val runGraph2: RunnableGraph[Future[Seq[Event]]] =
  FileIO.fromPath(path) // Source[ByteString, Future[IOResult]]
	.via(JsonFraming.objectScanner(1024 * 1024))//Source[ByteString, Future[IOResult]]
	.via(Flow[ByteString].map(b => b.decodeString("UTF-8"))) // Source[String, Future[IOResult]]
	.via(Flow[String].map(s => s.parseJson.convertTo[Event]))// Source[Event, Future[IOResult]]
	.toMat(Sink.seq[Event])(Keep.right)
BidiFlow
아래의 그림들은 Source, Flow, Sink, BidiFlow를 그림으로 나타 낸 것이다.
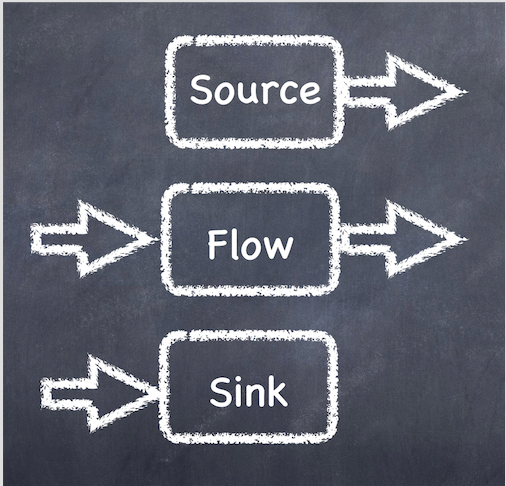
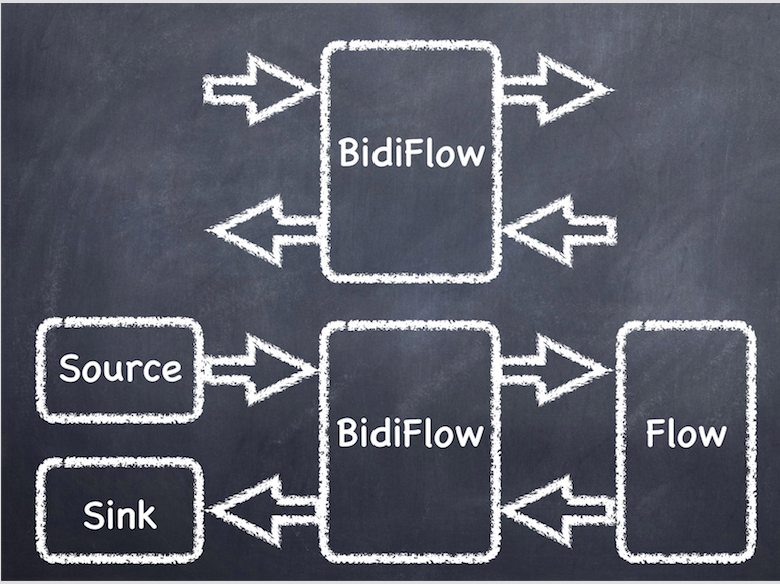
Source, Sink, Flow들은 위에 했던 내용을 그림으로 나타 냈으며, BidiFlow를 나타낸다.
BidiFlow는 하나의 출력 흐름의 Flow와 또 하나의 입력 흐름의 Flow를 겹친 것으로 기존의 입출력 flow들을 재 사용 할때 유용하다.
아래의 예제는 기존의 ByteString -> Event Flow와 Event -> ByteString flow에 Filter flow를 결합한 예이다.
val inFlow: Flow[ByteString, Event, NotUsed] =
  JsonFraming.objectScanner(1024 * 1024)
	.via(Flow[ByteString].map(b => b.decodeString("UTF-8")))
    .via(Flow[String].map(s => s.parseJson.convertTo[Event]))

val outFlow: Flow[Event, ByteString, NotUsed] =
Flow[Event].map(e => ByteString(e.toJson.compactPrint))

val source: Source[ByteString, Future[IOResult]] = FileIO.fromPath(path)
val sink: Sink[ByteString, Future[IOResult]] =
  FileIO.toPath(Paths.get("/Users/sslee/work/temp/bidiFlowJson.log"))

val bidiFlow: BidiFlow[ByteString, Event, Event, ByteString, NotUsed] =
  BidiFlow.fromFlows(inFlow, outFlow)

val flow: Flow[ByteString, ByteString, NotUsed] =
  bidiFlow.join(Flow[Event].filter(e => e.state == Error ))

val runGraph: RunnableGraph[Future[IOResult]] =
  source.via(flow).toMat(sink)(Keep.right)

runGraph.run().onComplete{
case Success(s) => println(s"#####$s")
case Failure(e) => println(s"#####$e")
}
Stream 내 요류처리
Stream의 실행 흐름에서 오류가 발생시 생각해볼 사항으로 오류처리에 대한 전략을 적용하는 방법과 결과에 대한 trait를 만들고 결과와 오류를 case class로 만들어 결과 trait type으로 원소를 흐르게 처리 한 다음 오류만을 filter를 하거나, 정상 원소만을 filter하거나 할 수 있을 것이다. 혹은 Either를 사용 할 수 도 있다.
방법이야 여러가지가 있겠지만 akka-stream에서는 Actor의 supervisor strategy 정책이 있듯이 stream component에 혹은 Materializer에 정책을 지정 할 수 있다.
akka-stream Supervision Decider
akka-stream은 감독전략을 제공 해준다.
오류처리 전략의 값으로는 Resume(무시), Stop(중지), Restart(재시작)가 있다.
component에 Decider를 제공
val jsonFlow: Flow[String, Event, NotUsed] =
  Flow[String].map(s => s.parseJson.convertTo[Event])
    .addAttributes(ActorAttributes.supervisionStrategy{
		case _: LogParseException => Supervision.Resume
		case _  => Supervision.Stop
  })
Materializer에 적용 하는 방법
이를 하면 모든 Graph에 적용 된다.
val decider: Supervision.Decider = {
  case _ : LogParseException => Supervision.Resume
  case _  => Supervision.Stop
}

implicit val mat = ActorMaterializer(
  ActorMaterializerSettings(system).withSupervisionStrategy(decider))
다음 post는 akka-stream를 akka-http에서 살펴 본다.